TWIN BOOM TRAINER PROJECT By
Bill Russell I am about to embark on a new project. The new project
stems from my need for a diversionary project when I am working on my main project.
Currently my main project is a Ziroli P-38. When I am working on a project I inevitably
come upon a frustration point and need to set it aside for a short time. I have
reached that point and the following project has stemmed forth, Giant Ugly Stick
Twin Boom Trainer. What I need from this project is a primary trainer to get used
to the habits of a P-38, and a test platform to break in engines and try radio
gear. In looking around my shop I found a wing from what was once a Bud Nosen
(?) low wing Giant Ugly Stick that had a minor altercation with a tree. 
The
concept is to make it cheap and easy, but also to help train for the expensive
Ziroli. Since I have the basic wing I hope to keep the rest of the airframe under
$300. So far at the local hobby shop I have spent $100 on balsa, spruce and ply,
I still need about $50 in sheeting but I ran them out.
Since I want this to
be a trainer for the P-38, I want it to mimic the Ziroli as best I can while keeping
it simple (K.I.S.S). So I will try to keep it as close to the Ziroli moments.
Leading edge damage from the crash happened to coincide almost exactly as the
same spacing for the P-38. I have not drawn up any plans, I am using the T.LA.R.
and S.W.A.G. methods and using my Ziroli plans for basic dimensions. After calculating
the wing area of the G.U.S. and the P-38 I have determined that I need to add
3 bays to each side of the wing, but I hate building wings so I'll do that later. |
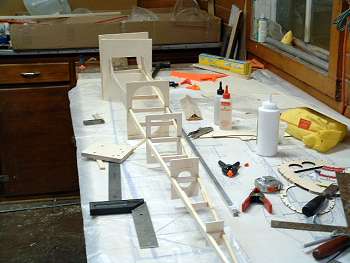 |
I built the Ziroli crutch and square up some of the formers. I made a template
for the wing saddle and tried to calculate the difference from side to side to
compensate for the dihedral. |
I added braces just behind the saddle to help stiffen this
area; I have heard it is a weak point on the Ziroli. Now if I had planned ahead
I would have notched the formers for the ¼" square corner pieces and
would not have had to cut them to fit between each former. I'll know better next
time! |  |
 | Boom
#1 is almost sheeted. I am not planning retracts for this as the cost of them
is too great (keep it cheap) to risk here, former in the center of the wing saddle
will be the mount for the wire gear. Additional formers will be placed in this
area as soon as I figure
the gear out
|
One boom sheeted, the other as much as I can, until the hobby
shop can get in some more wood. Top of boom in the front will be a hatch for easy
access to motor mount bolts and fuel tanks. Oh boy, it's starting to look like
something. Three days of shop time to get this far (not all in a row).While I
wait on sheeting, I'll start on the horizontal stab |  |
|
As you can see I have no plan, just build. Basic frame work for the stab |
| |
|
Close up of the attaching bolts for the stab. I am sure
that I will have to assemble/disassemble this several times during construction.
I will probably epoxy this together upon final assembly | |
 | Ready
to take back off, install lower spar, add blocking for Robart hinges, a little
spruce for the ballast box, then the sheeting. After sheeting I will add some
pre-shaped leading edge, (I have some lying around) and triangle stock on the
trailing edge for the pivot point. |
 | |  |
| Sheeted stab | |
Balast box |
| Stab leading edge installed. |  |
 | Vertical
fin framed up. I cut some large balsa blocks that I have lying around
to
get the large curved pieces in 1/2" thickness.
|
| Shows vertical fins in position.
This is all I've
gotten done this weekend. Had to work on club swap meet which took up most of
my weekend. (Editors note: Nice art collection Bill.) |  |
 | I
have the rudders framed up, need to do the hinging and lotsa sanding and then
I can sheet both assemblies. Wish I could use a router here, sure would save a
lot of time sanding. |
Elevator framed up, ply horn plates installed ready for top sheeting. |  |
 |
Fin and rudder #1 sheeted and hinged. I added a few more ribs to each fin
and ply horn plates to each rudder.
Almost finished at the tail. Need
to add some blocks to feather the boom
into the tail, will work on wing mount
blocks next and then on to the
center pod.
|
| Minor set back, after showing the project to some club members it was
pointed out that my rudders had no taper, which would result in turbulance, so
I decided to redo them. |
| | |
| spruce upright with balsa sheet center | |
ribs and ply horn plated installed |
| |
| new rudder on the right, old on the left, quite
a difference. |
Both new rudders are finished and I have started working
on the wing hold
down blocks. |  |
BACK to PROJECTS
|
|
Become an RCWarbrids site supporter by making a donation.
|
$5.00 |
 |
$10.00 |
|
$15.00 |
|
$20.00 |
|
| |
|
|
|
|


